






How to Build a Parallel Reaction Monitoring Assay
- Which proteins must be quantified, and is the goal relative or absolute abundance?
- What sample matrix will be analyzed across the full study?
- How many samples and time points are planned?
- Is the assay for exploratory comparison, validation, or repeated QC use?
- Are stable isotope-labeled internal standards available or required?
- compare precursor intensity across charge states in the study matrix
- confirm that the chosen precursor is stable across replicate injections
- document expected m/z values and retention times before window design
- reject precursors that show strong matrix-dependent suppression without recovery options
- start with a conservative window based on observed precursor width and retention stability
- widen gradually only when drift or m/z variability requires it
- narrow when co-isolated interferences distort fragment maps
- re-test windows after LC method changes or column batch changes
- document final window settings for each target precursor
- use multiple fragment ions per peptide when possible
- prefer ions with strong signal and stable ratios across replicates
- reject ions that are noisy or sensitive to minor matrix changes
- compare fragment patterns between standards and matrix spikes
- retain backup ions when post-acquisition re-integration may be needed
- sufficient run length to reduce co-elution
- stable retention times across batches
- cycle time compatible with the number of precursors in each window
- enough acquisition time per target for acceptable sensitivity
- QC checks for retention drift before large cohort runs
- inspection of fragment ion ratios across replicates
- calibration or response curve review when absolute quantitation is required
- matrix spike recovery assessment
- lower limit of quantitation estimation for critical targets
- system suitability and QC sample strategy for batch monitoring
Introduction
Targeted quantitation on a high-resolution mass spectrometer looks efficient on paper: define peptide targets, isolate precursors, and quantify fragment ions across samples. In practice, a parallel reaction monitoring assay often succeeds or fails during build-out long before the full cohort is acquired. Weak fragment maps, unstable integration, retention drift outside scheduled windows, or matrix suppression can all produce missing peaks and unreliable abundance values.
Dependable assay build-out depends on decisions made before large-scale acquisition begins. Which proteotypic peptides represent the target proteins in the actual matrix? How wide should each isolation window be? Which fragment ions support selective integration? How many precursors can the instrument cycle through in each retention window without losing sensitivity? These questions shape whether the final assay supports biomarker validation, biopharmaceutical monitoring, or pathway tracking with usable precision.
The sections below provide a practical workflow for PRM assay development, with emphasis on peptide selection, window design, and fragment ion optimization.
Related Services
Parallel Reaction Monitoring (PRM) Service
MRM/PRM Quantitative Proteomics Service
PRM-Based Peptide Quantification Service
Label-Free Quantitative Proteomics Service, MS Based
Quantitative Proteomics Service
For projects where target panels, window strategy, or validation depth are uncertain, MtoZ Biolabs can help evaluate whether full assay development, pilot optimization, or a discovery-to-validation pipeline best fits the quantitative goal.
Why PRM Assay Build-Out Often Underperforms
Most underperforming high-resolution targeted assays share a small set of root causes. The selected peptide may not be proteotypic in the study organism or digestion workflow. Isolation windows may be copied from literature without re-optimization in the local matrix. Fragment ions may be chosen from standards alone rather than from matrix-relevant MS2 maps. LC scheduling may not match actual retention times. Digestion may be inconsistent across samples.
Another common issue is treating peptide detection in discovery data as proof that the assay is ready. A peptide observed in profiling is a useful lead, not automatic evidence that isolation windows, fragment integration, and quantitation are selective and reproducible in the final matrix.
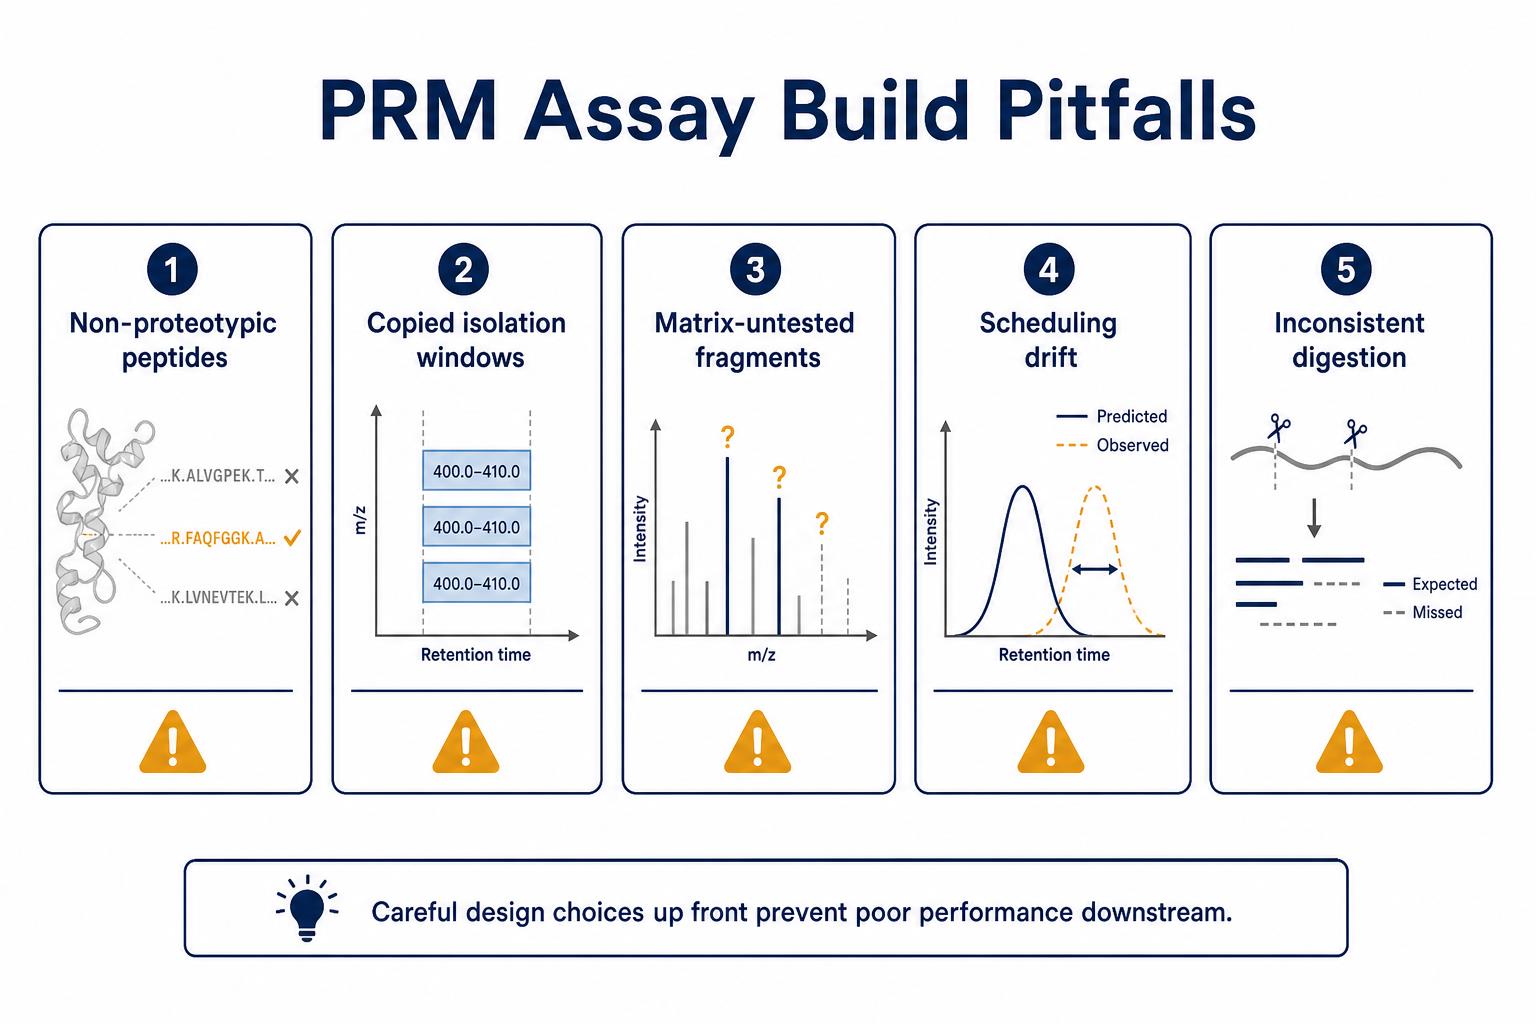
Figure 1. Common build-out pitfalls that reduce PRM assay performance before cohort acquisition begins
Assay design should be matrix-aware from the start. Plasma, cell lysate, tissue homogenate, and biopharmaceutical formulation each present different digestion, recovery, and interference challenges. Building windows and fragment rules on neat standards alone often misses suppression and co-elution that appear only in real samples.
Step 1: Define the Quantification Goal and Sample Matrix
Before selecting peptides, define what the assay must measure and where it will be used.
Useful planning questions include:
A pilot panel of three proteins in cell lysate is a different build-out task from a ten-protein plasma assay intended for a large validation cohort. Scope definition prevents oversized panels that exceed cycle capacity or underbuilt validation for high-stakes use.
Step 2: Select Proteotypic Peptides
Proteotypic peptides are surrogate measures of their parent proteins. Good candidates are usually unique to the target, efficiently produced by the chosen enzyme, free of problematic residues, and detectable with stable chromatographic behavior.
|
Peptide Selection Factor |
Preferred Characteristic |
Why It Matters |
|---|---|---|
|
Sequence uniqueness |
Proteotypic within the relevant proteome context |
Reduces ambiguity in protein inference |
|
Peptide length |
Often 7-25 residues after tryptic digestion |
Very short or long peptides may fragment or ionize poorly |
|
Missed cleavages |
Predictable and acceptable if documented |
Unexpected cleavage patterns complicate quantitation |
|
Modifications |
Known and controlled when present |
Oxidation or other shifts can alter precursor behavior |
|
Ionization behavior |
Strong precursor signal in matrix-relevant tests |
Weak responders reduce assay sensitivity |
|
Retention behavior |
Reproducible elution without severe co-elution |
Supports scheduled acquisition and cleaner integration |
Start with in silico filtering, then confirm candidates experimentally in the intended matrix. Discovery data, spectral libraries, and standard peptide injections can all inform selection, but final choice should depend on observed performance rather than prediction alone.
For multi-protein panels, prioritize one to three peptides per protein initially. Additional peptides can be retained as backups if the primary surrogate fails validation.
Step 3: Test Precursor Charge States in Matrix-Relevant Material
Unlike triple-quadrupole MRM, parallel reaction monitoring begins with precursor isolation rather than predefined transition pairs. For each selected peptide, test precursor charge states on the high-resolution platform using matrix-matched injections when possible.
Practical priorities include:
Precursor testing should use the same digestion and cleanup workflow planned for study samples. A strong signal in neat buffer does not guarantee performance in plasma, tissue, or formulation matrix.
Step 4: Optimize Isolation Windows
Isolation window width is a central design parameter when building a high-resolution targeted assay. The instrument must isolate the target precursor without admitting excessive interferences or missing the ion when retention drifts.
Window optimization priorities include:
A window that is too narrow causes missed targets when retention shifts. A window that is too wide admits neighboring ions that complicate fragment integration and reduce specificity.
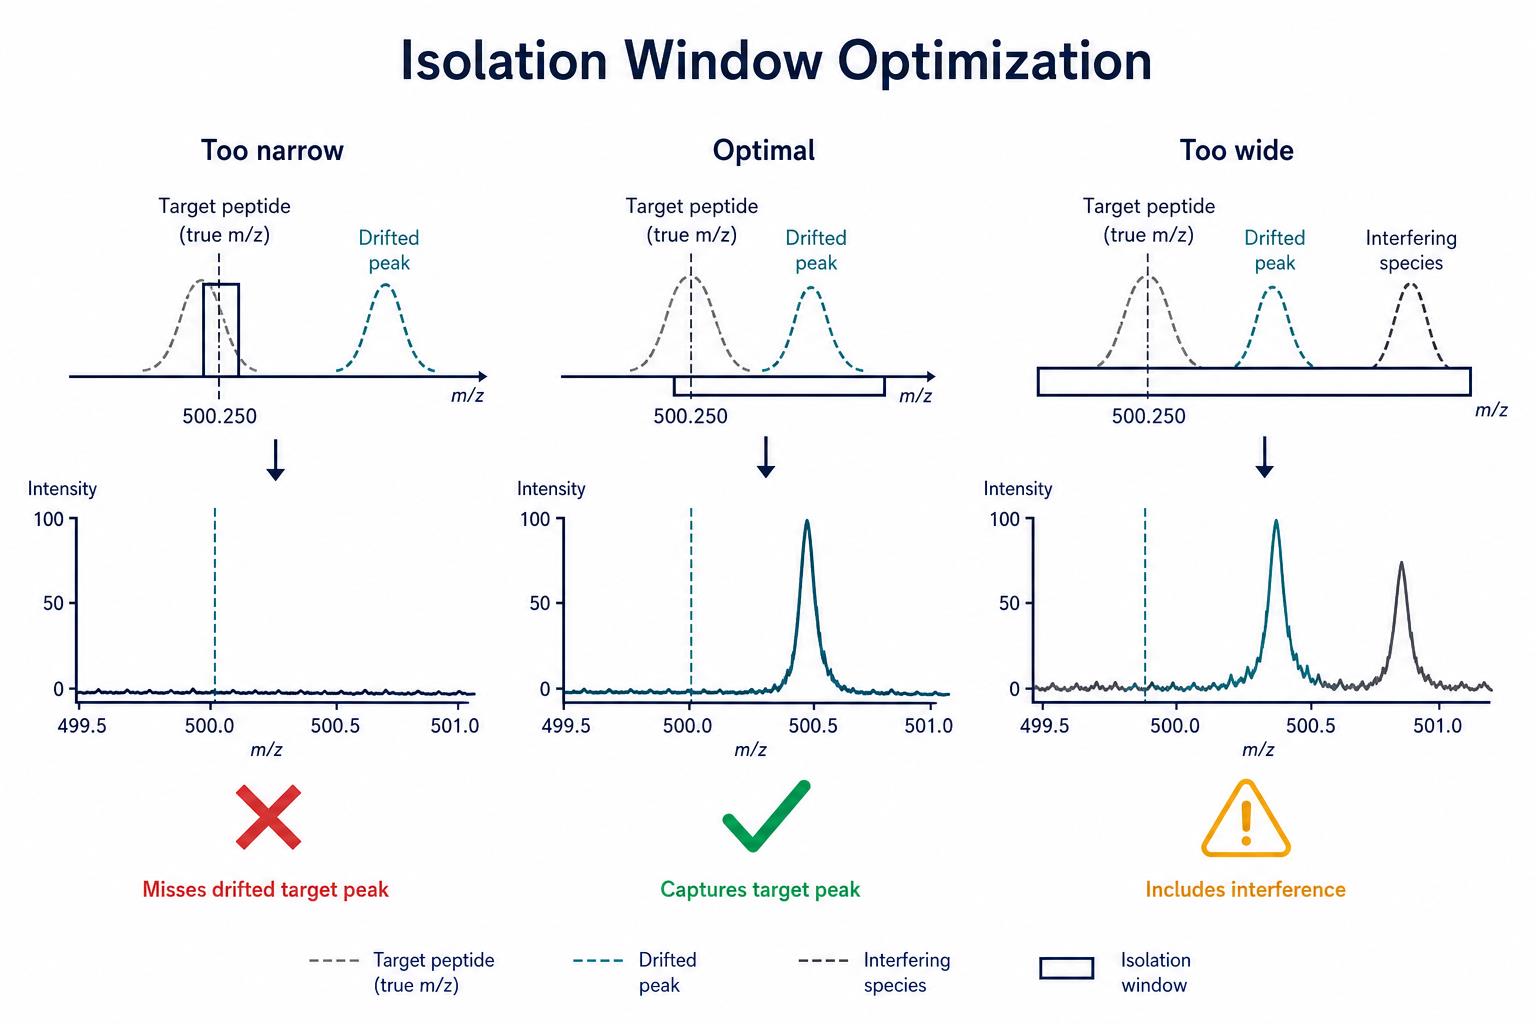
Figure 2. Isolation window width balances retention drift tolerance against interference from co-isolated precursors
Step 5: Select Fragment Ions for Quantitation
After precursor isolation, fragment ions from the acquired MS2 spectrum support both confirmation and quantitation. Select ions that are intense, reproducible, and consistent across standards and matrix test samples.
Fragment selection priorities include:
Using several fragment ions improves specificity. Interference that affects one ion may not distort the full expected pattern for the target peptide. Fragment ratio consistency across QC injections is a useful checkpoint during build-out.
Step 6: Develop LC Method and Scheduled Acquisition
Chromatography separates target peptides in time and supports selective acquisition. Match gradient length to panel complexity. Define retention time windows for each precursor and use scheduled acquisition so the instrument isolates targets only during expected elution.
Practical LC and scheduling considerations include:
Poor scheduling is a common hidden failure mode. If the instrument misses the correct window, a valid peptide can appear absent even when sample preparation is otherwise sound.
Step 7: Prepare Samples with Consistent Digestion
Targeted quantitation depends on reproducible peptide generation. Standardize enzyme type, digestion time, temperature, cleanup, and storage conditions across the study. Matrix spikes and labeled internal standards should be introduced at defined points when absolute or more precise relative quantitation is required.
Document protein input amount, digestion protocol, and any cleanup or fractionation steps. Inconsistent digestion can change surrogate peptide yield and create false abundance differences between groups.
Step 8: Validate Assay Performance Before Scale-Up
Validation should match the intended use of the assay. At minimum, review selectivity, response range, precision, and matrix interference during build-out.
A useful validation package may include:
Do not move to full cohort acquisition until primary peptides, window settings, and fragment integration perform acceptably in matrix-relevant test samples.
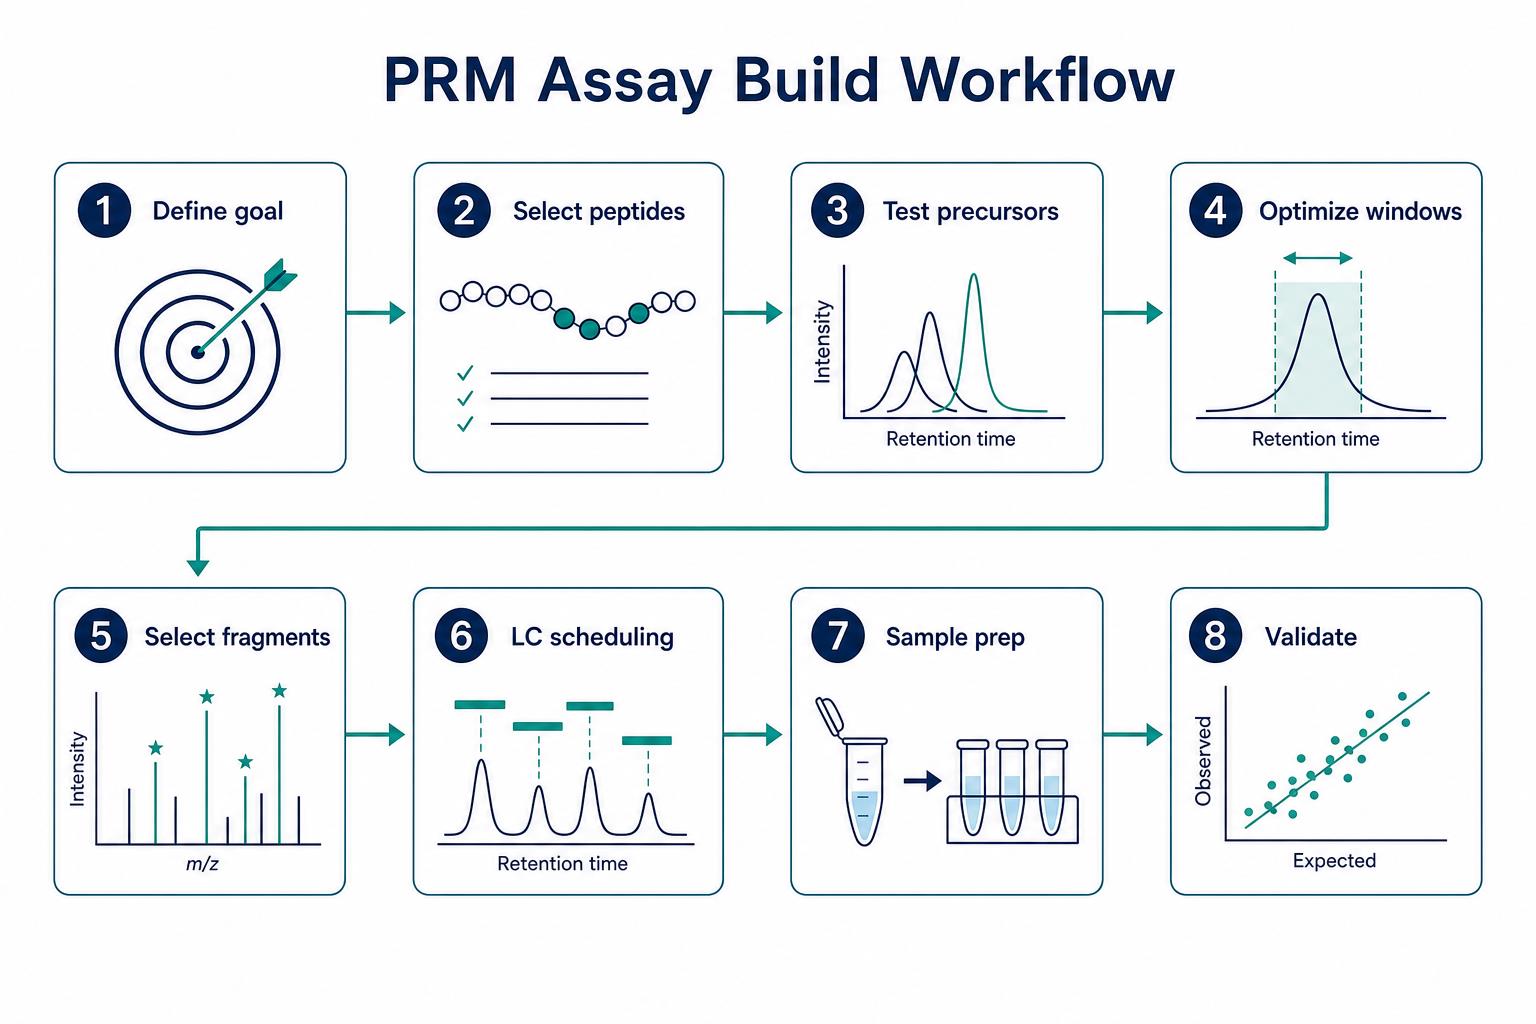
Figure 3. Practical workflow from target definition through peptide selection, window optimization, and assay validation
Expected Outputs From a Built Assay
|
Output Type |
Typical Content |
Best Used For |
|---|---|---|
|
Target panel list |
Proteins and selected proteotypic peptides |
Assay documentation and transfer |
|
Precursor and window table |
m/z values, charge states, isolation widths |
PRM method setup |
|
Fragment ion list |
Selected ions with integration notes |
Quantitation and confirmation |
|
LC schedule |
Retention windows and cycle parameters |
Scheduled acquisition |
|
Quantitative report |
Peak areas or concentrations across samples |
Study analysis |
|
Validation summary |
Selectivity, precision, and matrix performance notes |
QC, validation, or transfer support |
|
Recommended QC approach |
System suitability and monitor samples |
Batch-to-batch control |
The deliverable should match the decision behind the project. Exploratory method build-out may require less documentation than an assay intended for repeated biopharmaceutical or clinical use.
Key Cautions
Do not select peptides solely from in silico prediction without experimental testing. Do not copy window settings from unrelated matrices without revalidation. Do not rely on a single weak fragment ion when multiple selective ions are available. Do not expand the panel beyond instrument cycle capacity without revisiting scheduling. Do not skip matrix testing because standards perform well in neat solvent.
Pilot build-out on a limited subset of targets often saves more effort than repeating failed cohort acquisitions. Early PRM assay development on matrix-relevant material is especially valuable for plasma, tissue, and formulation backgrounds where suppression and interference are common.
Frequently Asked Questions
1. What is the first step in building a parallel reaction monitoring assay?
The first step is to define the quantification goal, target proteins, sample matrix, and whether the assay must support relative or absolute quantitation.
2. What makes a peptide suitable for high-resolution targeted quantitation?
A suitable peptide is usually proteotypic in the relevant proteomic context, ionizes well in the study matrix, shows reproducible chromatography, and produces a usable high-resolution fragment map after precursor isolation.
3. How wide should an isolation window be?
Window width depends on precursor stability, retention drift, and interference from neighboring ions. Windows are optimized experimentally in matrix-relevant material rather than set from a fixed default.
4. Why optimize fragment ions in the actual sample matrix?
Matrix components can suppress ionization or create interferences that are not visible when fragment rules are defined only in neat standards.
5. When is the assay ready for full cohort acquisition?
The assay is usually ready when primary peptides, window settings, and fragment integration show acceptable selectivity, reproducibility, and matrix performance in pilot samples representative of the study design.
Conclusion
Building a parallel reaction monitoring assay depends on deliberate proteotypic peptide selection, careful isolation window optimization, selective fragment ion integration, controlled LC scheduling, and matrix-aware validation. Weak assay performance is often traceable to build-out shortcuts rather than instrument limits alone. Define the quantitative goal early, test peptides and windows in the real matrix, and validate performance before scaling to the full sample set.
If you need help building or refining a high-resolution targeted panel for biomarker validation, biopharmaceutical monitoring, or pathway quantitation, contact MtoZ Biolabs to discuss parallel reaction monitoring assay development, window optimization, or an integrated targeted proteomics workflow.
How to order?