


How to Design a Mitochondrial Proteomics Study: From Sample Grouping to Analysis Strategy
A mitochondrial proteomics study should begin with the research question and the protein-level evidence needed to address it. The study groups, biological units, sample feasibility, enrichment plan, and analytical strategy should then be aligned before sample collection. Insufficient material, poorly defined comparisons, or inadequate biological replication cannot be fully corrected by downstream LC-MS/MS acquisition.
Start by defining the primary biological question and all planned comparisons. Next, identify the biological unit, establish appropriate groups and controls, confirm that sufficient and consistently handled material is available, and determine whether mitochondrial enrichment is required. The analytical workflow can then be selected according to the intended identification and quantitative outputs. When these elements align, the data can be interpreted with greater confidence and with a lower risk of technical or design-related confounding.
The sections below provide a pre-collection planning framework covering research questions, sample feasibility, grouping, biological replication, enrichment, and analytical strategy. The purpose is to identify design gaps while the project can still be adjusted.
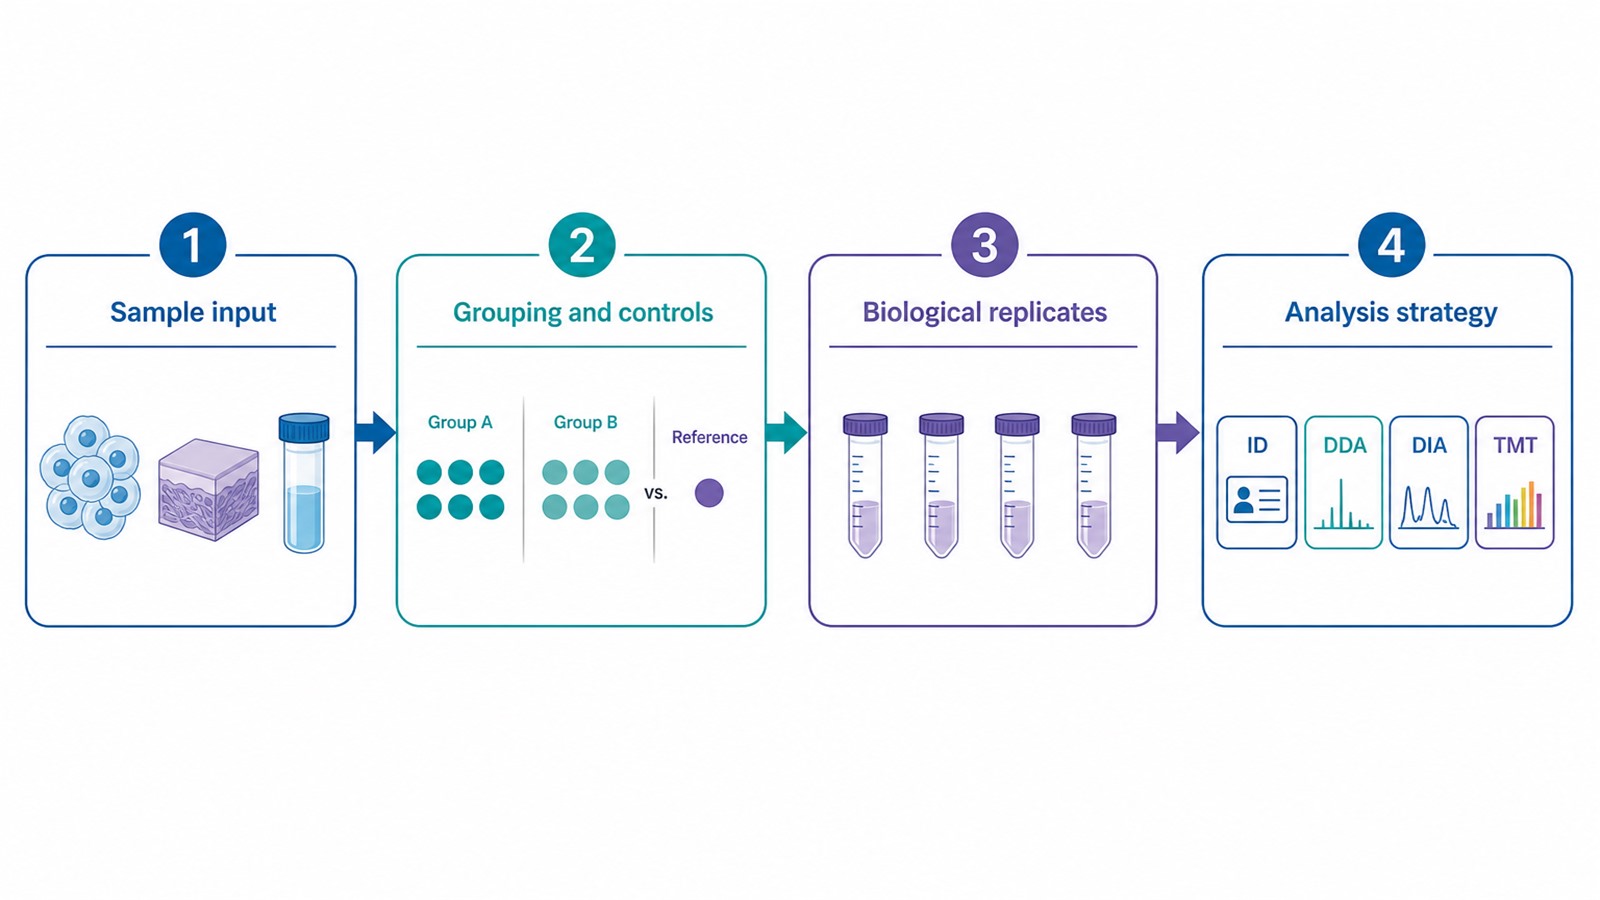
Figure 1. The design sequence: settle sample input, then grouping and controls, then replication, and only then the analysis strategy.
Phase 1: Define the Research Question and Confirm Sample Feasibility
First define the biological question and the evidence the study is expected to provide. Then confirm whether the available material can support the required enrichment, preparation, and LC-MS/MS workflow. Three starting-material routes are commonly considered for MtoZ Biolabs project planning.
|
Sample input |
Planning amount |
Common use |
|---|---|---|
|
Cells |
~5×10^7 cells |
Enrichment performed from cultured material |
|
Animal tissue |
~200 mg |
Enrichment starts from tissue |
|
Isolated mitochondrial |
≥50 μg total protein, 80 to 100 μg preferred; concentration ≥0.5 μg/μL, preferably ≥1 μg/μL |
Mitochondrial preparation completed before submission |
These figures are planning baselines rather than fixed requirements for every matrix. Unusual tissues, low-yield isolations, or scarce clinical material should be confirmed before collection, since a thin sample leaves no room to repeat a step.
Two habits keep this stage from creating hidden problems. Keep one input path across every arm, because mixing cell-derived and tissue-derived mitochondria adds preparation differences that can imitate biology. Budget a modest reserve of material, since a second acquisition mode or a repeat injection needs protein that a minimal sample cannot spare.
Planning a mitochondrial proteomics study? Share your sample type, available amount, and proposed group design through our Mitochondrial Proteomics Project Inquiry Form to discuss initial feasibility.
Phase 2: Define Groups and Controls Around One Contrast
Groups should differ in one intended biological way, and the control should isolate exactly that difference. Write the contrast as a single sentence before naming any arm.
Typical contrasts include treated versus vehicle, disease versus matched control, or mutant versus wild type. Once the contrast is explicit, build the arms so that age, sex, culture density, isolation day, and handling delay stay matched across groups. The cleaner that match, the more confidently a later comparison points to biology rather than logistics.
Control choice depends on the question being asked. A vehicle control matters when a solvent or carrier could itself shift mitochondrial proteins. A wild-type or healthy control anchors a genotype or disease comparison. A baseline sample suits a longitudinal design, but only when collection timing is matched across subjects.
If the control differs from the treatment arm in more than the intended variable, any difference found later is ambiguous. That ambiguity is a design flaw, not something downstream statistics can repair.
Phase 3: Plan Biological Replicates, Not Technical Repeats
Biological replicates are independent samples from different animals, subjects, or culture batches. They carry the variation that supports a group comparison. Technical replicates are repeated measurements of one extract and mainly report instrument variation.
Fix what counts as one biological unit before you count anything. An animal is usually one unit. An independent culture flask or dish is usually one unit. Several wells split from the same dish are not independent biology.
How many units each arm needs depends on the expected effect size and how variable the system is. A large, consistent shift can appear with fewer units, while a subtle abundance change needs more. Because the right number is specific to the study, it should be agreed during design rather than borrowed from an unrelated paper. Replication carries extra weight in organelle work, since enrichment itself introduces handling variation that only independent units can average out.
A practical habit is to write the biological unit definition next to the group labels before collection begins. That short note often prevents later arguments about whether three dishes from one parent culture count as three replicates or one.
Phase 4: Choose the Analysis Route Last
Choose the analysis strategy after samples, groups, and replicates are realistic, so the method matches the cohort you can actually deliver.
|
Study need |
Possible strategy |
Key design considerations |
|---|---|---|
|
Discovery-oriented profiling of proteins detected in the preparation |
DDA or DIA profiling |
Required identification depth, protein coverage, and consistency across samples |
|
Quantitative comparison across biological samples |
DDA- or DIA-based label-free quantification |
Sample number, missingness, chromatographic consistency, batch design, and statistical comparisons |
|
Projects prioritizing consistent measurement across samples |
DIA quantification |
Quantitative consistency, missing-data behavior, acquisition stability, and processing strategy |
|
Predefined multiplexed comparison |
TMT quantification |
Channel capacity, sample balance, labeling design, pooled references, and cross-batch normalization |
Protein identification and quantitative comparison are connected rather than mutually exclusive outputs. A quantitative proteomics workflow generally includes peptide and protein identification in addition to abundance measurement. Projects should define whether they require identification-focused profiling, quantitative comparison, or both, and what level of depth and consistency is needed.
Mitochondrial enrichment should be selected according to the intended evidence. It is useful when the study requires analysis of a mitochondrial-enriched fraction or aims to improve the representation of mitochondrial-associated proteins. Whole-cell proteomics may be appropriate when the priority is to study mitochondrial proteins within a broader cellular response.
Within an enrichment-based comparison, preparation procedures should be consistent across samples. However, interpretation should also consider mitochondrial content, recovery efficiency, co-isolated proteins, and sample-level quality-control evidence.
Pre-Collection Project Checklist
Treat the points below as a go or no-go review before the first harvest. A blank answer usually signals a design gap rather than a detail to settle later.
Sample and input
- The sample path is fixed and identical across arms.
- The amount per sample meets the planning baseline for that path.
- A modest material reserve is planned for repeat injections if needed.
- Enrichment chemistry is planned identically for every arm.
Grouping and controls
- The primary research question and all planned comparisons are clearly defined.
- The control isolates the tested effect and nothing else.
- Covariates such as sex, age, diet, and handling delay are matched across arms.
Replication and batch layout
- The biological unit is defined, and replicate counts are set from real units.
- Technical repeats are not counted as biological replicates.
- Groups are mixed across preparation batches and run order.
Analysis route
- The required outputs are defined: identification-focused profiling, quantitative comparison, or both.
- The acquisition route matches cohort size and structure.
- Software workflow is aligned with the route: MaxQuant or Proteome Discoverer for DDA, Spectronaut or DIA-NN for DIA.
A short conversation with MtoZ Biolabs at this stage can confirm that the plan is internally consistent before collection begins.
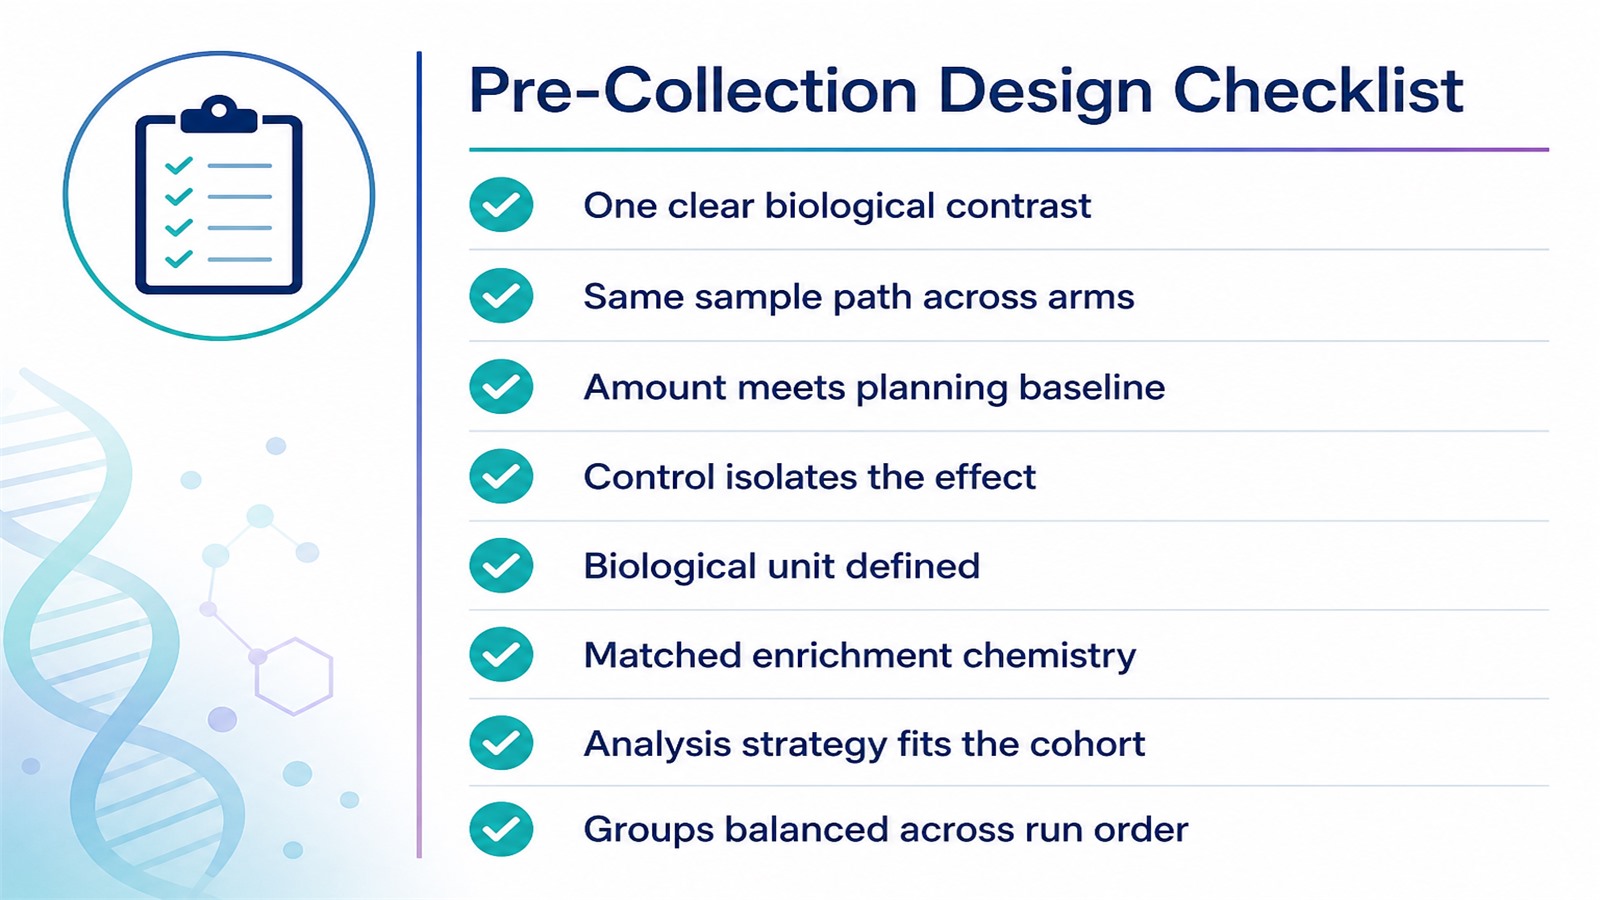
Figure 2. A pre-collection checklist that keeps sample, group, replicate, enrichment, and analysis decisions consistent.
Related Services
Mitochondrial Proteomics Service
Mitochondrial Isolation and Mitochondrial Protein Purification Service
Subcellular Proteomics Service
Frequently Asked Questions
How do I design a mitochondrial proteomics study from scratch?
Write the biological contrast first, match the sample path and amount across groups, plan enough independent biological replicates, keep enrichment consistent, and choose an analysis strategy that fits the cohort and the claim.
How much sample is needed for mitochondrial protein analysis?
Plan around ~5×10^7 cells, ~200 mg of animal tissue, or isolated mitochondrial protein at ≥50 μg with 80 to 100 μg preferred and a concentration of ≥0.5 μg/μL, preferably ≥1 μg/μL. Confirm unusual matrices before collection.
How many biological replicates should each group include?
At least three independent biological replicates per group are generally recommended. The appropriate number depends on biological variability, expected effect size, study design, missing-data risk, multiple testing, and the statistical power required for the intended comparison.
Is mitochondrial enrichment required for every study?
No. Enrichment is useful when the study requires evidence from a mitochondrial-enriched fraction or aims to improve coverage of mitochondrial-associated proteins. Whole-cell proteomics may be more appropriate when broader cellular context is central to the research question.
What information should be prepared before consulting a service provider?
Prepare the research question, sample type, preparation status, available amount, study groups, biological unit definition, replicate plan, primary comparisons, and intended protein-level outputs.
Conclusion
Designing a mitochondrial proteomics study is largely a planning task completed before the instrument is involved. Settle the sample path and amount, draw the group map around one contrast, set biological replicates from real units, and open the analysis strategy only when those foundations hold. That sequence, from sample grouping to analysis route, is what lets mitochondrial protein analysis return a comparison you can defend.
Teams preparing a first project can review the plan with MtoZ Biolabs before collection. It helps to arrive with the sample type, sample amount, planned study groups, and the expected analytical output already drafted, so the design and the deliverable stay aligned from the start.
How to order?