


How to Design a Plant Proteomics Study for Abiotic Stress Research
If you are planning plant proteomics for abiotic stress research, settle four things before you harvest: how the stress treatment is defined, which tissue you will sample, how treated and control plants will be compared, and when material will be collected. Those choices matter more than the instrument name on the quote.
Start with a clear comparison in everyday research language. For example, drought-treated leaf versus a matched well-watered control at a defined stress condition and harvest time. Next, collect suitable material for that organ type, keep every group under the same handling rules, and only then choose whether you need protein identification, quantitative comparison, or a staged plan that begins with a focused pilot and expands later. A strong design lets you argue that protein changes come from the stress itself, not from mismatched tissues, uneven sampling, or mixed harvest timing.
Decide These Points Before You Harvest
Most abiotic stress proteomics problems begin at the greenhouse or growth chamber, not at the mass spectrometer. If plants are harvested before the comparison is clear, the dataset is hard to rescue later.
Define the stress treatment, not just its name. Record the treatment intensity or dose, duration, and the criterion used to determine the harvest point. Drought, salt, temperature extremes, nutrient limitation, and heavy metal exposure can produce different protein responses. Putting two stressors into one treated group without a defined design usually blurs the result.
Choose the tissue with the biology in mind. Leaf and root often answer different questions. Pooling organs only makes sense when you truly want a whole-plant readout.
Keep the first comparison simple. Treated versus matched untreated control is usually enough to start. For multiple genotypes, include genotype-matched controls when the goal is to distinguish baseline genotype differences from stress-induced responses.
Think about timing. One harvest can miss short-lived changes. Early and later collections often tell different stories, so decide whether a single time point is enough or whether a short series is needed. Time-course studies should also use appropriately time-matched controls when temporal changes may affect protein abundance.
Be honest about the output you want. A protein list is useful for characterization. A stress comparison needs quantification.
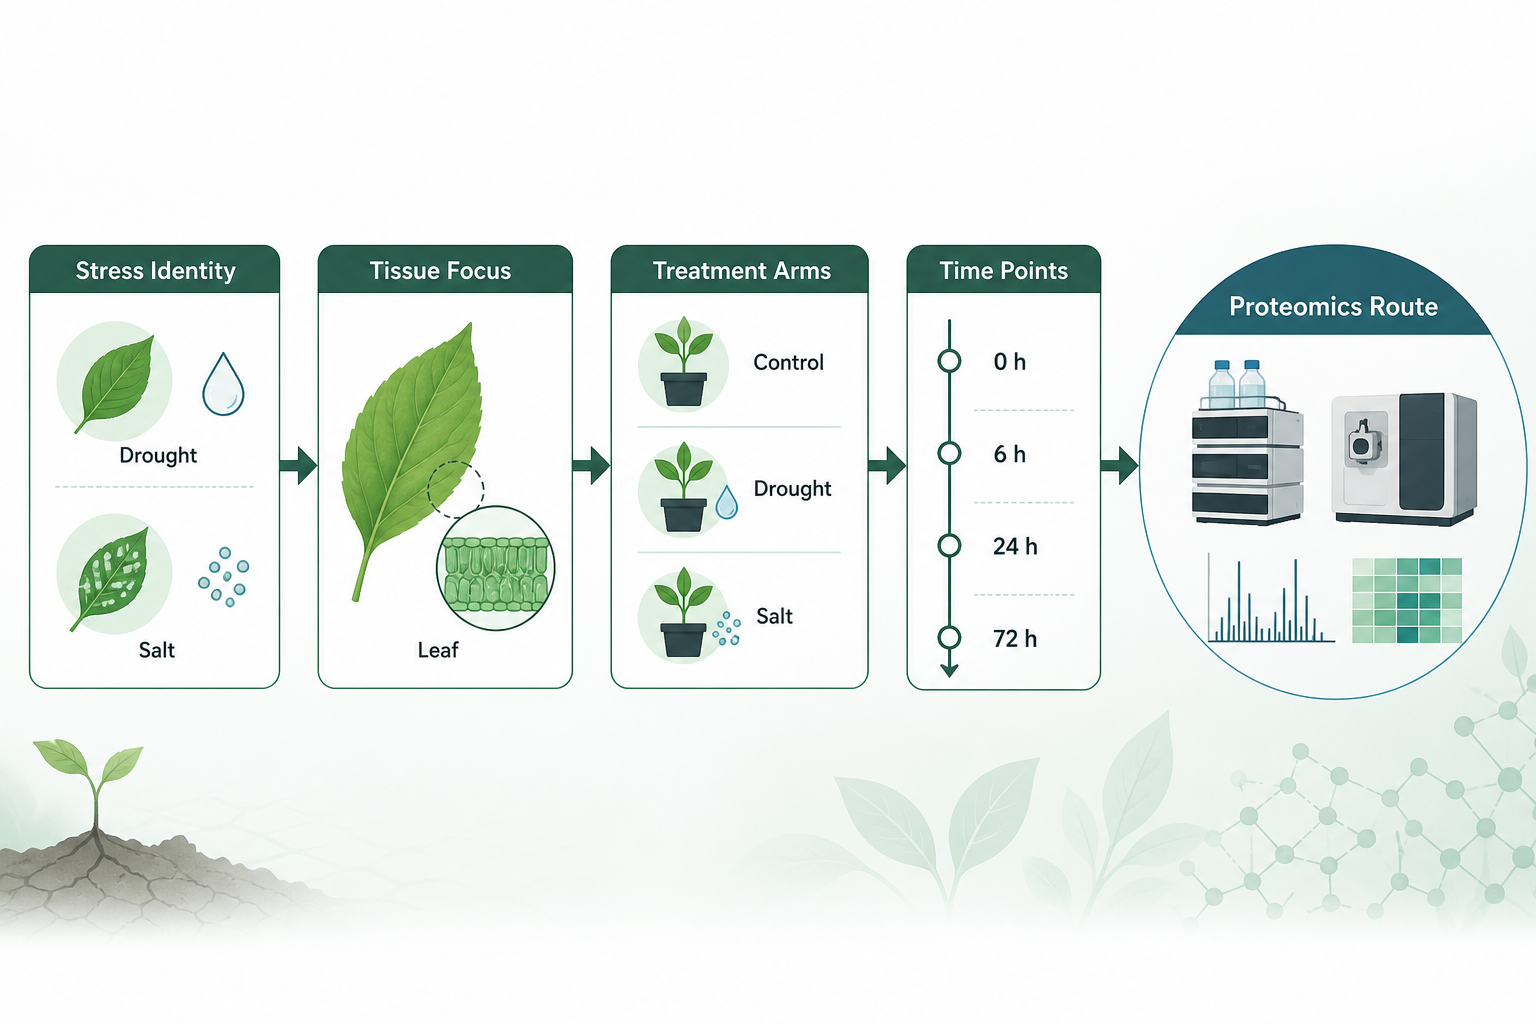
Figure 1. Define the stress treatment, tissue, comparison groups, and sampling times before choosing the proteomics approach.
Planning Sample Collection
Plant tissues are not interchangeable when it comes to protein recovery. Soft leaves behave differently from woody roots or seeds, and pollen may require a different collection plan.
| Plant sample type | Collection guidance | Typical use |
| Soft tissues such as leaves, flowers, grasses, algae, ferns, or fleshy fungal tissue | Confirm the required amount before collection | Leaf drought or salt studies |
| Hard tissues such as roots, bark, twigs, fruits, or seeds | Allow for tissue-specific extraction difficulty and confirm requirements in advance | Root salinity or nutrient studies |
| Pollen | Confirm requirements for the specific project before collection | Dedicated pollen harvest and storage |
Required material depends on tissue type, water content, extraction difficulty, and analytical scope. Fixed collection amounts should therefore be confirmed for the specific project before sampling. Avoid degraded, contaminated, or repeatedly freeze-thawed material. Use one tissue type and one storage path across matched groups, and confirm acceptance requirements for unusual, infectious, or regulated materials before shipment.
A plant proteomics project typically involves protein extraction, digestion, LC-MS/MS analysis, and downstream data interpretation according to the selected analytical scope.
Building Treated and Control Groups
Pick one main comparison before you add layers. Common setups include stressed versus matched control plants, a graded stress series, or stress followed by recovery.
Match everything that is not the stress itself: genotype, growth stage, light cycle, baseline watering, sampled organ, and time of day at harvest. If the control plants are older, or come from a different tissue, the comparison is no longer clean.
When more than one genotype is included, use a design that separates genotype effects from stress effects. A common structure includes control and stressed groups for each genotype rather than comparing stressed genotypes alone.
Define the experimental unit according to how the stress is independently applied. A plant or pot can serve as a biological replicate only when it represents an independent treatment unit. Multiple samples from the same treated tray, tank, or other shared unit should not automatically be counted as independent biological replicates.
A focused first round is often a two-group comparison at one carefully chosen time point. A later expansion can add dose levels, recovery sampling, or a second organ once the main protein changes are clear.
Timing the Harvest to the Stress Response
Abiotic stress does not unfold in one step. Early harvests may capture early protein-abundance responses, while rapid signaling events may require phosphoproteomics for more direct analysis. Later harvests more often reflect metabolic adjustment, slowed growth, or accumulating damage.
Useful timing patterns include:
-
One time point when the phenotype is already well described and the question is narrow
-
Early plus later time points when you want to separate immediate response from longer remodeling
-
Stress plus recovery when you care which protein changes reverse after the stress ends
Do not combine early and late samples into one treated group. If both windows matter, label them separately and write the harvest clock next to each group name before the experiment starts.
A short phenotype note at harvest also helps later interpretation. Wilting score, a simple water-status note, or visible chlorosis category can place a protein change in an early response window or a late damage window. That note is not part of the proteomics result itself, and it should not be used to overclaim a physiological threshold from abundance data alone.
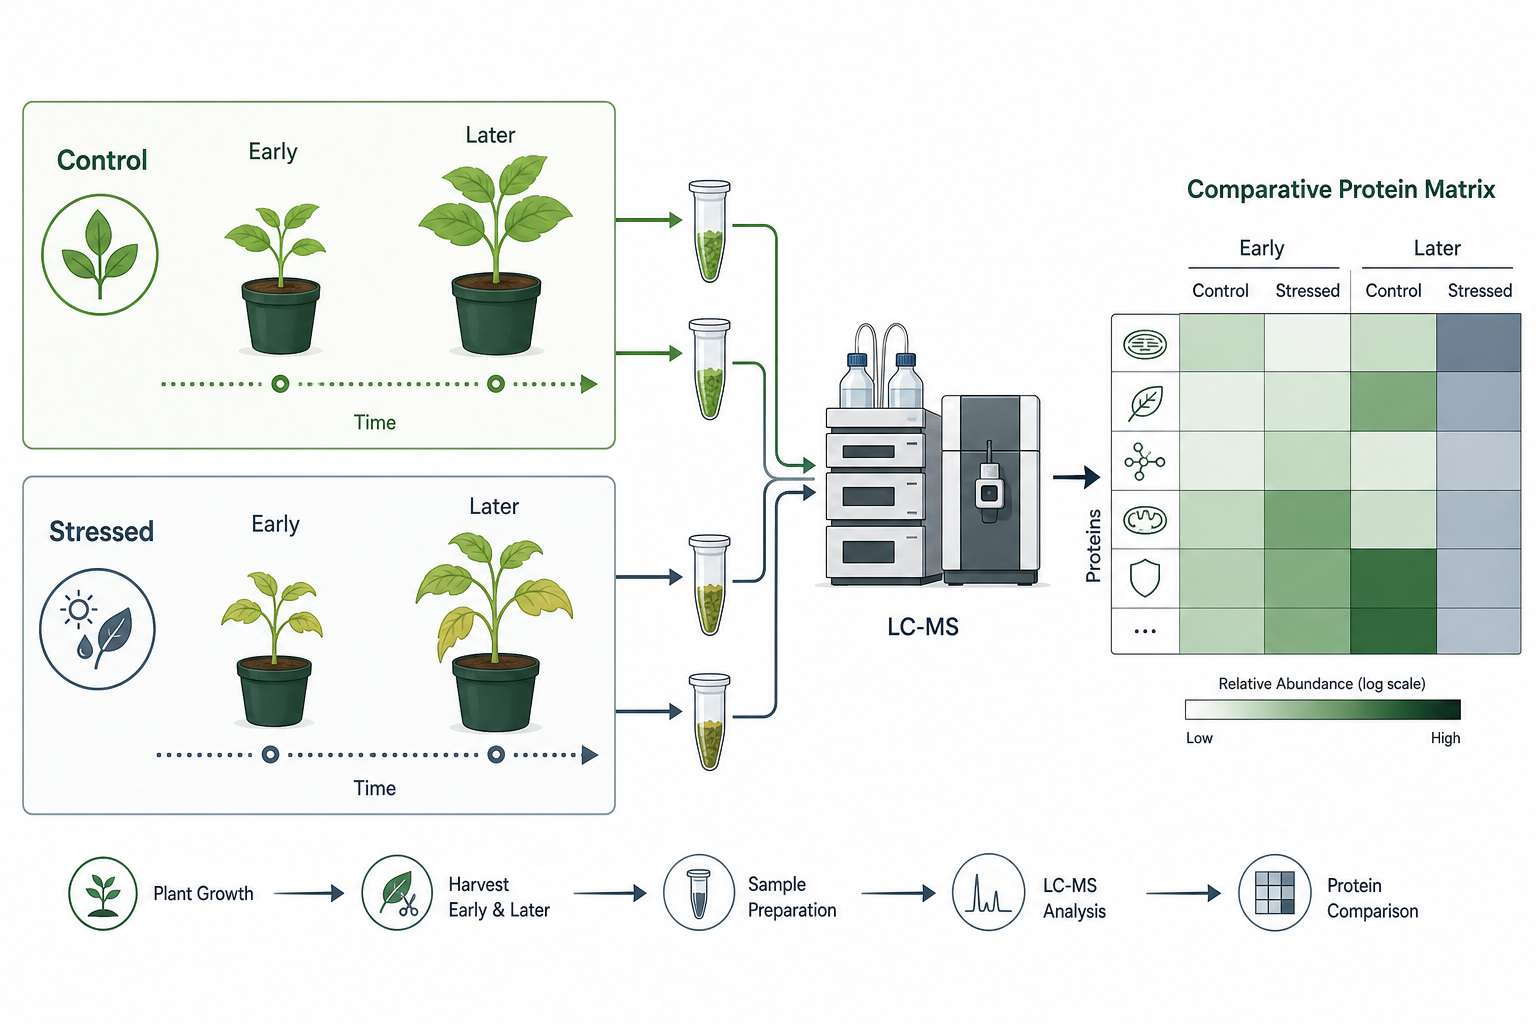
Figure 2. Matched stress and control groups with appropriately matched harvest windows make comparative results easier to interpret.
Choosing the Proteomics Approach
Once the groups and tissue plan look realistic, choose the analytical approach from the research question.
Protein identification is a good fit when you mainly need to see which proteins are present in a tissue or stress condition. Quantitative comparison is needed when you want to know which proteins increase or decrease between stress and control.
DDA and DIA can both support plant proteomics, but the choice should not be based on sample number alone. Consider the quantitative objective, required data consistency, study scale, and analytical workflow. The appropriate mass spectrometry platform can then be selected according to the finalized study design and analytical requirements.
Many abiotic stress projects benefit from a staged path: a first quantitative comparison on a clean two-group design, then a later expansion to additional time points or tissues. Avoid building a large multi-group map before genotype, dose, and harvest timing are stable.
A quantitative plant proteomics report can include differential analysis, functional annotation, pathway enrichment, and protein interaction context depending on the species and analysis scope. Use pathway enrichment to help prioritize candidates, not as final proof of mechanism.
If metabolite shifts are central to the stress story, plant metabolomics is better planned as a companion experiment than inferred from proteins alone. If signaling becomes the next question after an abundance screen, plant phosphoproteomics can be considered in a later round once the main stress comparison is stable.
Before You Harvest and Ship Samples
Define the stress treatment, including the relevant dose or intensity, duration, and harvest criterion.
Write down the sampled tissue and main comparison.
Add genotype-matched or time-matched controls when the study design requires them.
Decide whether one time point is enough, or whether early and later windows are needed.
Confirm sample requirements for the selected tissue before collection and keep handling consistent across groups.
Avoid degraded, contaminated, or repeatedly freeze-thawed material.
Choose identification or quantification after the study set is fixed, then select DDA or DIA according to the quantitative goal, required consistency, study scale, and workflow, with an appropriate mass spectrometry platform selected for the finalized analytical plan.
Decide early whether metabolomics or phosphoproteomics should follow as a companion study.
If any of these points are still open, settle them before harvest. MtoZ Biolabs can review stress type, tissue, group labels, sampling times, and expected output before the analytical plan is finalized. For project-specific planning, see the Plant Proteomics Service.
Related Services
Plant Phosphoproteomics Analysis Service
Frequently Asked Questions
1. How should an abiotic stress proteomics study be designed?
Define the stress treatment, tissue, treated and matched control groups, experimental units, and sampling times first. Choose the proteomics approach only after those decisions are clear.
2. How much plant tissue is needed?
The required amount depends on tissue type, water content, extraction difficulty, and analytical scope. Confirm the requirement for the specific sample type before collection.
3. How many time points are needed?
One well-characterized harvest can be enough for a focused question. Use early and later windows when you want to separate immediate response from later acclimation, with appropriately matched controls when needed.
4. Should leaf and root be pooled?
Usually no. Leaf and root answer different stress questions. Keep organs separate unless you specifically want a whole-plant readout.
5. Which samples should not be sent?
Degraded, contaminated, or repeatedly freeze-thawed samples should be avoided. Confirm acceptance requirements in advance for unusual, infectious, or regulated materials.
6. Is quantification always required?
Quantification is required when you want to compare protein abundance between groups. Identification alone fits inventory-style characterization, not stress comparison questions.
Conclusion
Good plant proteomics for abiotic stress research starts with a clearly defined stress treatment, matched groups, appropriate tissue, and well-planned harvest timing. Consistent handling and a valid replicate structure help prevent experimental variation from looking like a biological stress response. After the study design is clear, choose identification or quantification and select the acquisition strategy and mass spectrometry platform that fit the analytical objective.
To review an abiotic stress proteomics design before sample collection, contact MtoZ Biolabs with the stress condition, tissue, group design, harvest windows, and expected output.
How to order?