


Abiotic Stress Proteomics: How to Plan Samples, Groups, and Time Points
For abiotic stress proteomics, plan samples, groups, and time points together, not as three separate afterthoughts. The tissue you collect sets how much material you need. The groups define what biological difference the protein map can support. The time points decide whether you catch an early response, a later acclimation state, or both. The treatment record should also show how strongly the stress was applied and whether the plants reached the intended physiological state.
A practical starting plan looks like this: one tissue type, a treated versus procedure- and environment-matched control comparison, and either one well-characterized harvest or an early-plus-later pair. Once those pieces are written down, quantification by DDA or DIA becomes much easier to choose. If any one of them stays vague, protein changes are hard to interpret even when the LC-MS/MS run looks clean.
Start With the Sample, Not the Instrument
Abiotic stress proteomics is only as strong as the plant material behind it. Before you choose an analytical approach, decide which organ carries the biology you care about and how much of it you can collect consistently.
Leaf tissue is common for drought, heat, cold, and salinity screens that show canopy-level symptoms. Root tissue is often more informative for salt, nutrient, or heavy-metal questions that begin below ground. Seeds, bark, twigs, and pollen each need their own collection logic and should not be mixed into a leaf study without a clear biological reason.
Suggested collection amounts for planning:
|
Plant sample type |
Suggested collection amount |
Planning note |
|
Soft tissues such as leaves, flowers, grasses, algae, or ferns |
about 2 g |
Common for foliar drought or salt studies |
|
Hard tissues such as roots, bark, twigs, fruits, or seeds |
about 5 g |
Useful for root or woody-organ questions |
|
Pollen |
about 100 mg |
Needs a dedicated harvest and storage path |
Treat these figures as collection guides, not promises about proteome depth. Keep one tissue type and one storage path across every group. Avoid degraded, contaminated, or repeatedly freeze-thawed material. Infectious plant material cannot be accepted.
If several plants must be pooled to obtain enough material, each independently assembled pool counts as one biological replicate. Splitting one pooled sample into several tubes does not create additional biological replicates.
A plant proteomics project typically includes protein extraction, digestion, and LC-MS/MS. Gel imaging and similar standalone preparation work are generally outside this workflow.
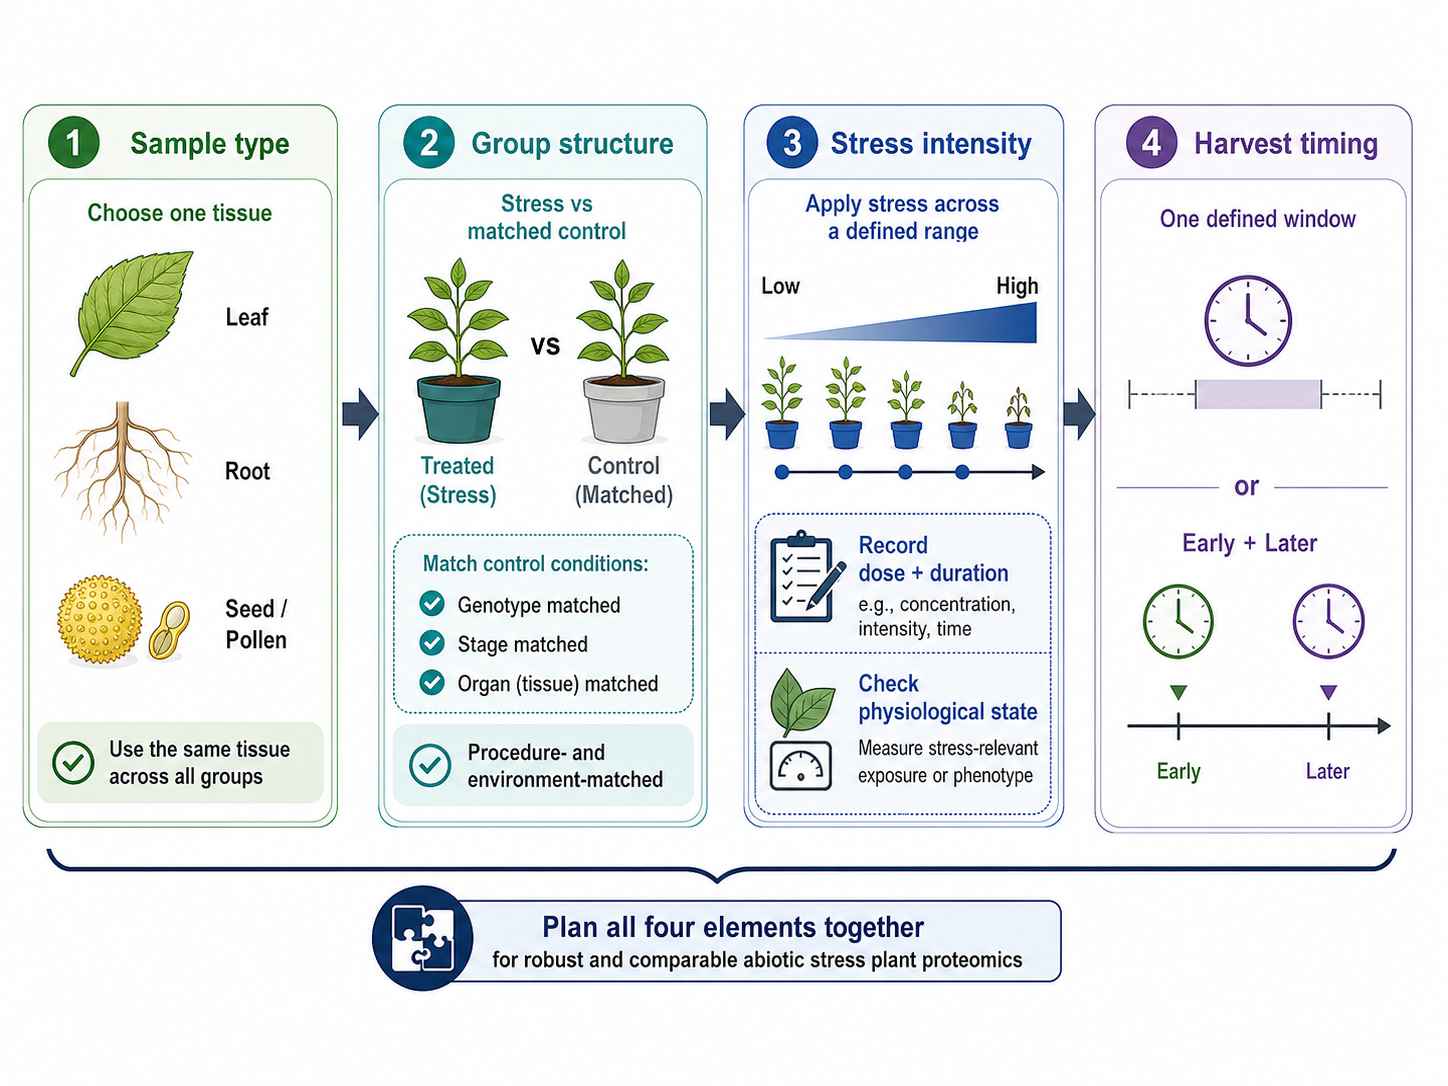
Figure 1. Sample type, group structure, stress intensity, and harvest timing should be planned as one connected design.
Build Groups Around One Clear Stress Comparison
Groups answer a simple question: what difference do you want the protein data to explain? For abiotic stress work, the cleanest first comparison is treated versus a matched control that reproduces all relevant conditions except the intended stress under the same genotype, growth stage, and harvest organ.
Depending on the model, the control may need to match the carrier solution, osmotic background, ion composition, nutrient solution, watering procedure, handling, and environmental conditions. An untreated plant is not always an adequate control if the stress treatment also changes the medium, watering process, solvent, or handling.
Useful group layouts include:
- Stress versus matched control at one harvest window
- Control, low stress, and higher stress when intensity matters
- Stress and recovery when you care which protein changes persist or change after the stress ends
- A genotype × stress design when genotype-dependent responses are the question
Match everything that is not the intended stress: genotype, developmental stage, light cycle, baseline watering, sampled organ, and time of day at harvest. If the control plants are older or come from a different leaf rank or root zone, the comparison stops being a stress comparison.
Also record the applied dose or treatment duration together with a stress-relevant exposure or phenotype measure. The same nominal treatment does not guarantee the same physiological stress state across plants. Depending on the project, this may include substrate water status, actual exposure temperature, root-zone conductivity, visible injury, growth inhibition, or another measure appropriate to the stress model.
Define biological replicates before counting tubes. Biological replicates must come from independently treated experimental units. Depending on how the stress is applied, the experimental unit may be a plant, pot, tray, hydroponic container, or growth chamber. Several leaves from one plant are subsamples rather than independent plant-level replicates.
Abiotic stress setups often appear highly replicated until harvest shows that many tubes came from one shared tray, treatment container, or chamber. Randomization, blocking, and more than one independent treatment unit should be considered when tray, chamber, or container effects could be confounded with the stress condition.
A focused first round with two groups is usually easier to defend than a large multi-factor map drawn before the phenotype is stable. A later expansion can add dose levels, recovery sampling, or a second organ once the main response is clear.
|
Group layout |
What it can support |
What to watch |
|
Stress vs matched control |
Main abiotic stress protein changes |
Match stage, organ, treatment procedure, and environment |
|
Graded stress series |
Intensity-linked protein patterns |
Record actual exposure and do not collapse doses |
|
Stress plus recovery |
Stress and recovery-associated protein patterns |
Include time-matched controls and define recovery conditions |
|
Genotype × stress design |
Genotype-specific stress responses |
Include control and stress arms for each genotype |
Comparing two genotypes only under stress identifies differences between those genotypes in the stressed state. It cannot distinguish pre-existing genotype differences from genotype-specific stress responses.
Choose Time Points That Match Stress Biology
Time points are where abiotic stress proteomics most often loses clarity. Early harvests may capture rapid defense and signaling-related protein shifts. Later harvests more often reflect metabolic adjustment, slowed growth, acclimation, or accumulating damage. Mixing those windows into one treated group hides both stories.
Ask three timing questions before you set the harvest calendar:
- Is the biological stage of interest clearly defined at the planned harvest? If yes, one time point can provide a focused snapshot of that stage.
- Do you need to separate immediate response from later remodeling? If yes, plan an early window and a later window as separate groups.
- Do you care what happens after the stress is removed? If yes, add a recovery harvest and keep it labeled on its own.
One time point cannot distinguish transient, sustained, and recovery-associated protein changes. Visible symptoms alone are also not always the best basis for timing, because severe symptoms may indicate late tissue damage rather than early stress adaptation.
Write the harvest clock next to each group name before the experiment starts. Include hours or days after stress begins, and keep that clock identical across treated and control plants harvested in the same window. A short phenotype or exposure note at harvest, such as wilting score, chlorosis category, growth change, or another stress-relevant measurement, helps later readers interpret whether a protein change occurs during early response, acclimation, or damage. That note is not part of the proteomics result and should not be used to claim a physiological threshold from abundance data alone.
A recovery design should define when recovery begins, how long it lasts, and what conditions are restored. It should also include an age- and time-matched control. Changes after recovery should not automatically be interpreted as a simple reversal of the original stress response.
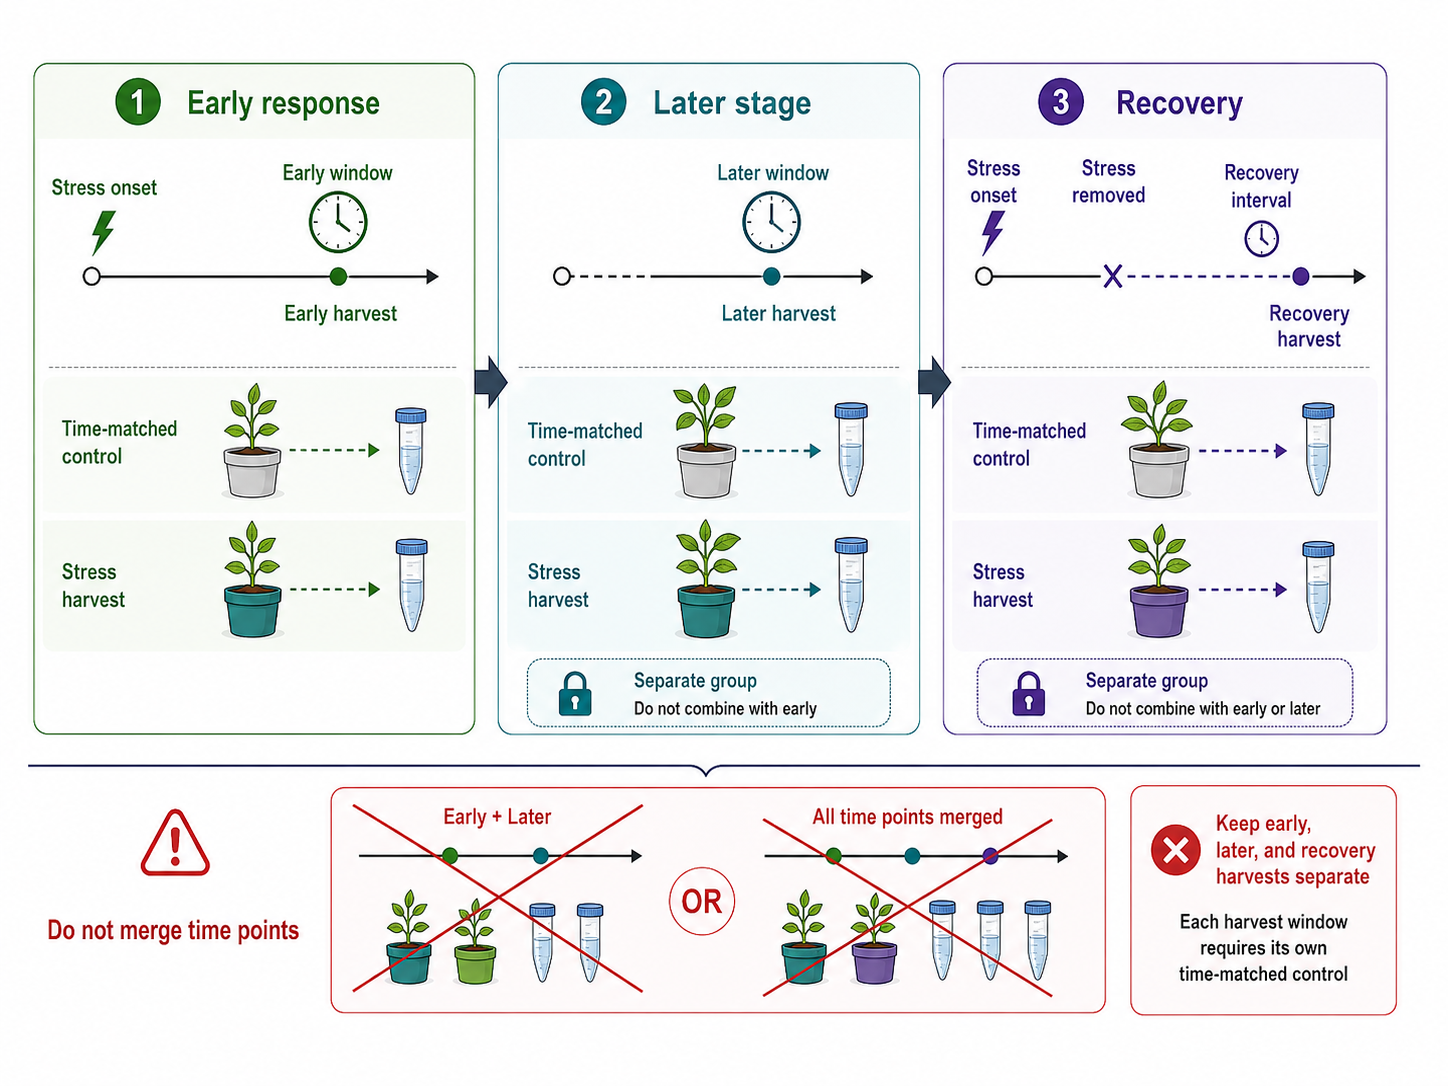
Figure 2. Early, later, and recovery harvests should remain separate and should each have an appropriate time-matched control.
Connect Samples, Groups, and Timing Before Analysis
Once tissue, groups, stress intensity, and time points are realistic, the analytical choice becomes simpler. Protein identification fits inventory-style characterization. Quantitative comparison is needed when you want abundance differences between stress and control.
Both DDA and DIA can support pilot and comparative studies. Method selection should consider sample complexity, required proteome depth, quantitative completeness, instrument platform, and downstream analysis goals. DIA is often considered when consistent quantification across multiple samples and reduced missing values are priorities. Common processing options include MaxQuant or Proteome Discoverer for DDA data and Spectronaut or DIA-NN for DIA data.
A workable sequence for many abiotic stress projects is a first quantitative comparison on one tissue and two groups at one or two time points, followed by expansion to dose, recovery, genotype, or another organ once the main response and phenotype measurements are stable. Avoid building a large multi-group map before stress intensity, experimental units, and harvest timing are clear.
A quantitative plant proteomics report can include differential analysis, functional annotation, GO and KEGG pathway views, protein association context, and Reactome analysis when the species is supported. Use pathway enrichment to prioritize candidates, not as final proof of mechanism. If metabolite shifts are central to the stress story, plant metabolomics is better planned as a companion study than inferred from proteins alone.
Before You Harvest and Ship
Write one sentence that names the stress and the tissue.
Record how the stress will be applied, including dose, duration, and a relevant exposure or phenotype measure.
List the groups in plain language, usually stress versus a procedure- and environment-matched control.
For multiple genotypes, include control and stress arms for each genotype when the goal is to compare stress responses.
Decide whether you need one defined snapshot, early and later windows, or a recovery group.
Identify the true experimental unit and confirm that biological replicates are independently treated.
Confirm collection amounts for the chosen tissue and keep the pooling strategy consistent across groups.
Exclude degraded, contaminated, repeatedly freeze-thawed, or infectious material.
Choose identification or quantification only after samples, groups, stress conditions, and time points are fixed.
Decide whether metabolomics should be planned as a companion study rather than inferred later from protein changes.
If any of these points are still open, settle them before harvest. MtoZ Biolabs can review tissue type, stress application and intensity, group labels, experimental units, replicate structure, sampling times, and the expected output before the analytical plan is finalized.
Related Services
Plant Phosphoproteomics Analysis Service
Frequently Asked Questions
1. What should be planned first in abiotic stress proteomics?
Plan the sample tissue, treatment and control groups, stress intensity, experimental units, and harvest times first. Choose the proteomics approach after those elements are realistic.
2. How much plant tissue is needed?
As a practical guide, plan about 2 g for soft tissues, about 5 g for hard tissues such as roots or seeds, and about 100 mg for pollen. Confirm unusual or limited sample types before collection.
3. How should groups be set for abiotic stress?
Start with stress versus a procedure- and environment-matched control under the same genotype, stage, and organ. Add dose, recovery, or genotype groups only when each additional comparison answers a defined question.
4. How should stress intensity be documented?
Record the applied dose and duration together with a stress-relevant exposure, physiological, or phenotype measure. Nominal treatment conditions alone may not show whether plants experienced comparable stress.
5. What counts as a biological replicate?
A biological replicate is an independently treated experimental unit. Depending on the setup, this may be a plant, pot, tray, hydroponic container, or growth chamber. Multiple leaves from one plant or multiple tubes from one pooled sample are not independent biological replicates.
6. How many time points are needed?
One well-defined harvest can provide a focused snapshot of one biological stage. Use early and later windows when you need to distinguish immediate response from later acclimation or damage. Add a separate recovery group when post-stress changes are part of the question.
7. Can early and late samples be combined into one treated group?
No. Early and late windows often reflect different biology. If both matter, label them as separate groups and include corresponding time-matched controls.
8. Which samples should not be sent?
Degraded, contaminated, or repeatedly freeze-thawed samples should be avoided. Infectious plant material cannot be accepted.
Conclusion
Abiotic stress proteomics becomes much easier to interpret when samples, groups, stress intensity, experimental units, and time points are planned as one design. Choose the tissue that carries the biology, build a clean stress-versus-control comparison, document the actual stress condition, and harvest at windows that match early response, later acclimation, damage, or recovery.
For genotype studies, compare the stress response within each genotype rather than comparing only the stressed materials. For recovery studies, include a time-matched control and define the recovery conditions clearly. After the design is stable, quantitative proteomics and pathway context can support candidate ranking without overclaiming mechanism.
To review an abiotic stress proteomics plan before collection, contact MtoZ Biolabs with the stress type and application method, tissue, treatment intensity, group labels, experimental unit and replicate structure, harvest windows, and expected output.
How to order?