


Step-by-Step ABPP Experiment Protocol: Probe Design, Labeling, LC-MS/MS, and Activity Profiling
-
Start by defining the enzyme class, biological model, and whether the readout is discovery, drug mechanism, or pathway regulation.
-
Activity-based probes (ABPs) must match the target enzyme chemistry and labeling mode (in vitro lysate versus in situ live cell).
-
Enrichment and digestion quality determine whether labeled active enzymes survive background proteome complexity.
-
LC-MS/MS acquisition and quantification strategy (label-free, TMT, or DIA) should be chosen before the first injection.
-
Activity profiles require specificity filtering, differential analysis, and pathway annotation rather than relying on peptide lists alone.
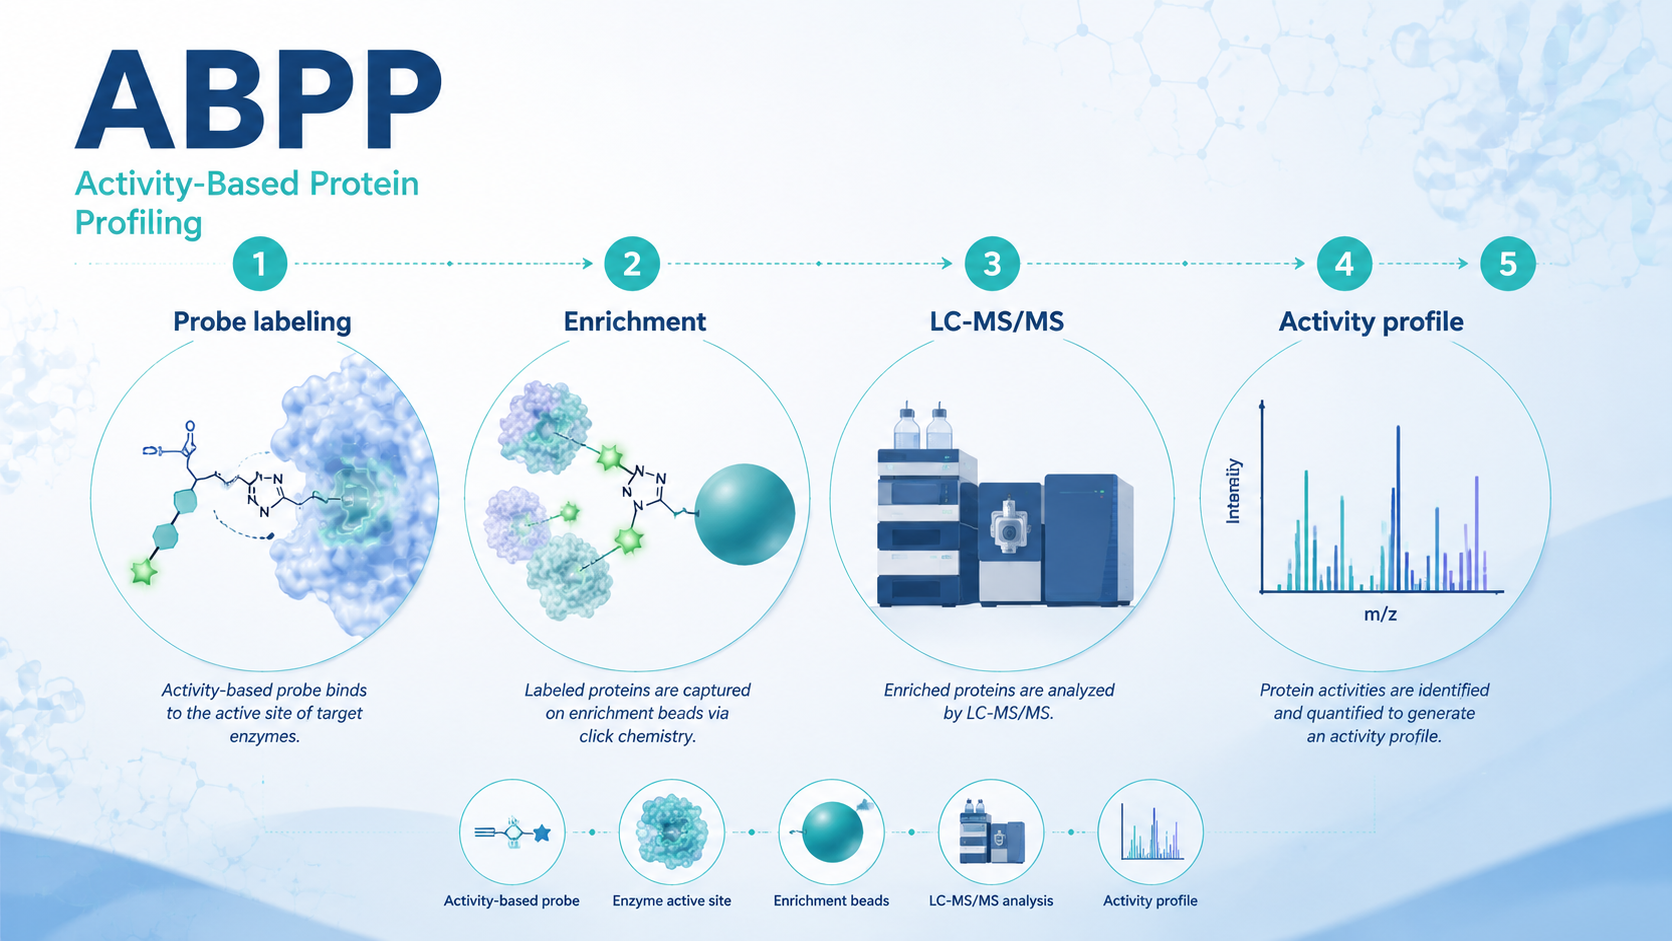
Activity-based protein profiling (ABPP) measures which enzymes are catalytically active, not only which proteins are expressed. A well-designed ABPP experiment links a clear biological question to probe chemistry, labeling conditions, enrichment, LC-MS/MS acquisition, and quantitative interpretation. This guide walks through each step so teams can run ABPP with fewer hidden failures in probe specificity, sample handling, or data analysis.
Key Takeaways
What ABPP Measures?
Conventional proteomics reports abundance. ABPP reports functional state by covalently labeling active sites with probes that react only when the enzyme is catalytically competent. That makes ABPP especially useful for proteases, phosphatases, deacylases, and other enzyme families whose activity changes under drug treatment, inflammation, or stress.
Related Services
Activity-Based Protein Profiling (ABPP) Service
Competitive Activity-Based Protein Profiling (ABPP) Service
Activity Based Protein Profiling Service
Small Molecule Drug Targets Identification Service | ABPP
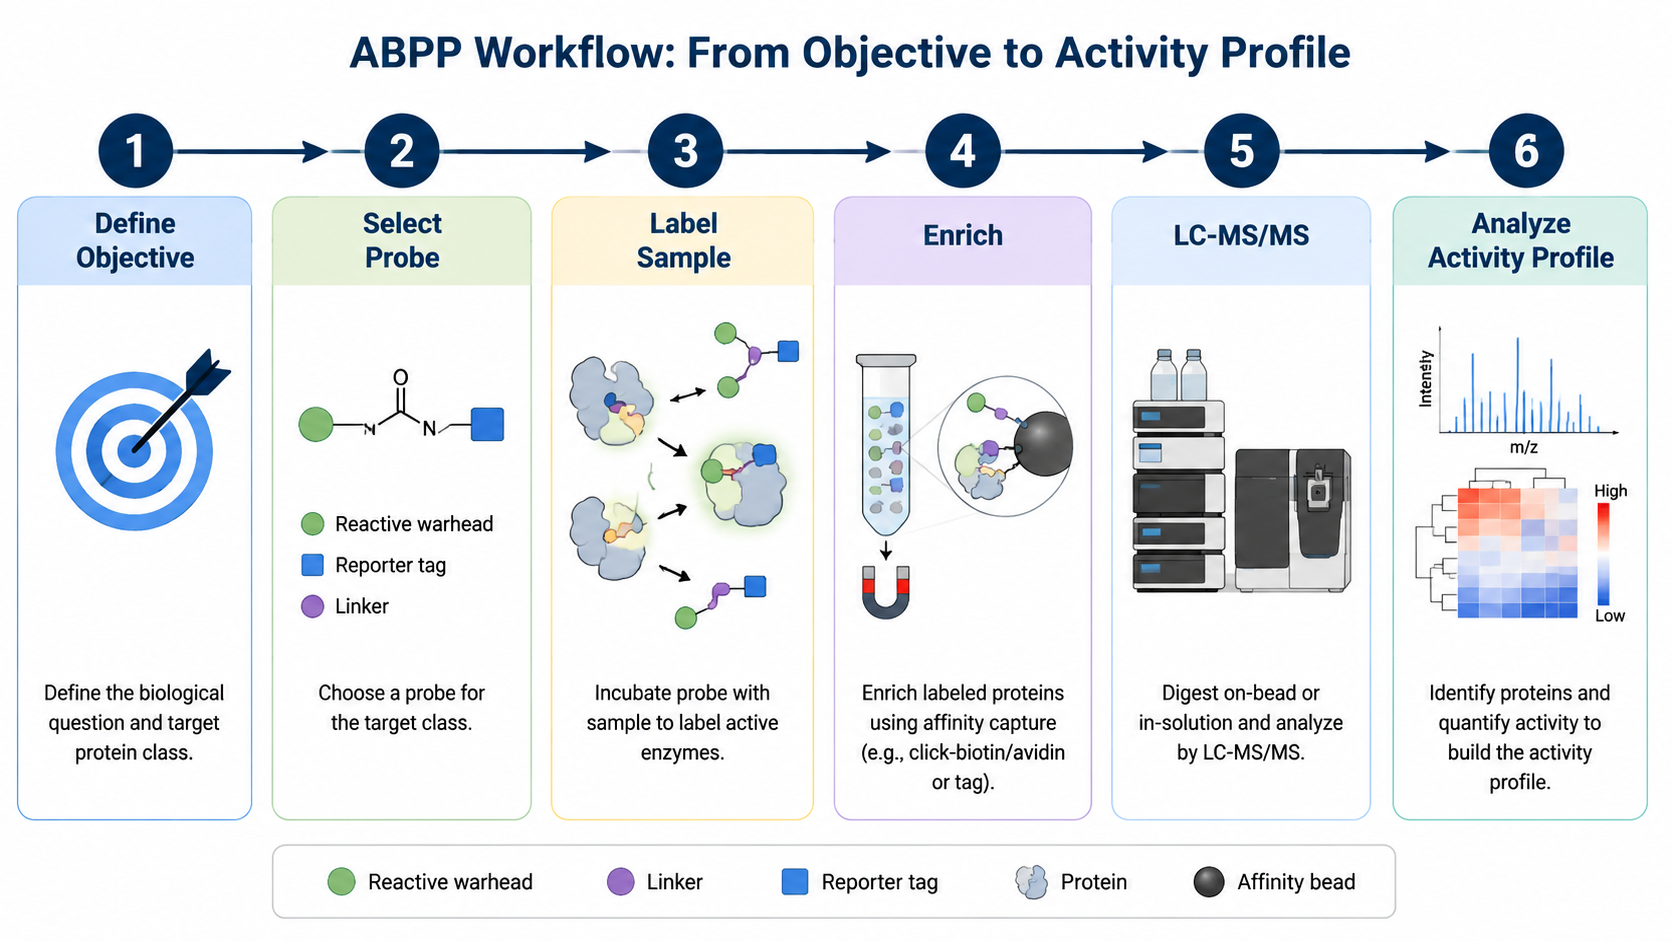
Step 1: Define the Research Objective and Enzyme Family
The first decision is which enzyme class matters and under which treatment or disease context. Common ABPP objectives include screening hyperactive proteases in tumors, testing whether a compound inhibits a target enzyme in cells, or mapping active enzymes in inflammatory or apoptotic signaling.
Different enzyme families need different probe chemistries. Locking the objective early prevents mismatched probes, weak enrichment, and analysis plans that cannot answer the biological question.
Step 2: Select or Customize Activity-Based Probes
Activity-based probes typically contain three parts: a reactive warhead that binds the active site, a linker that controls selectivity and solubility, and a tag for detection or enrichment (biotin, azide for click chemistry, or fluorescent handles for imaging).
Probe choice should balance target class coverage, reaction kinetics, and compatibility with in vitro versus live-cell labeling. Custom probe design is justified when commercial panels do not cover the enzyme family or when competitive labeling experiments need matched chemotypes.
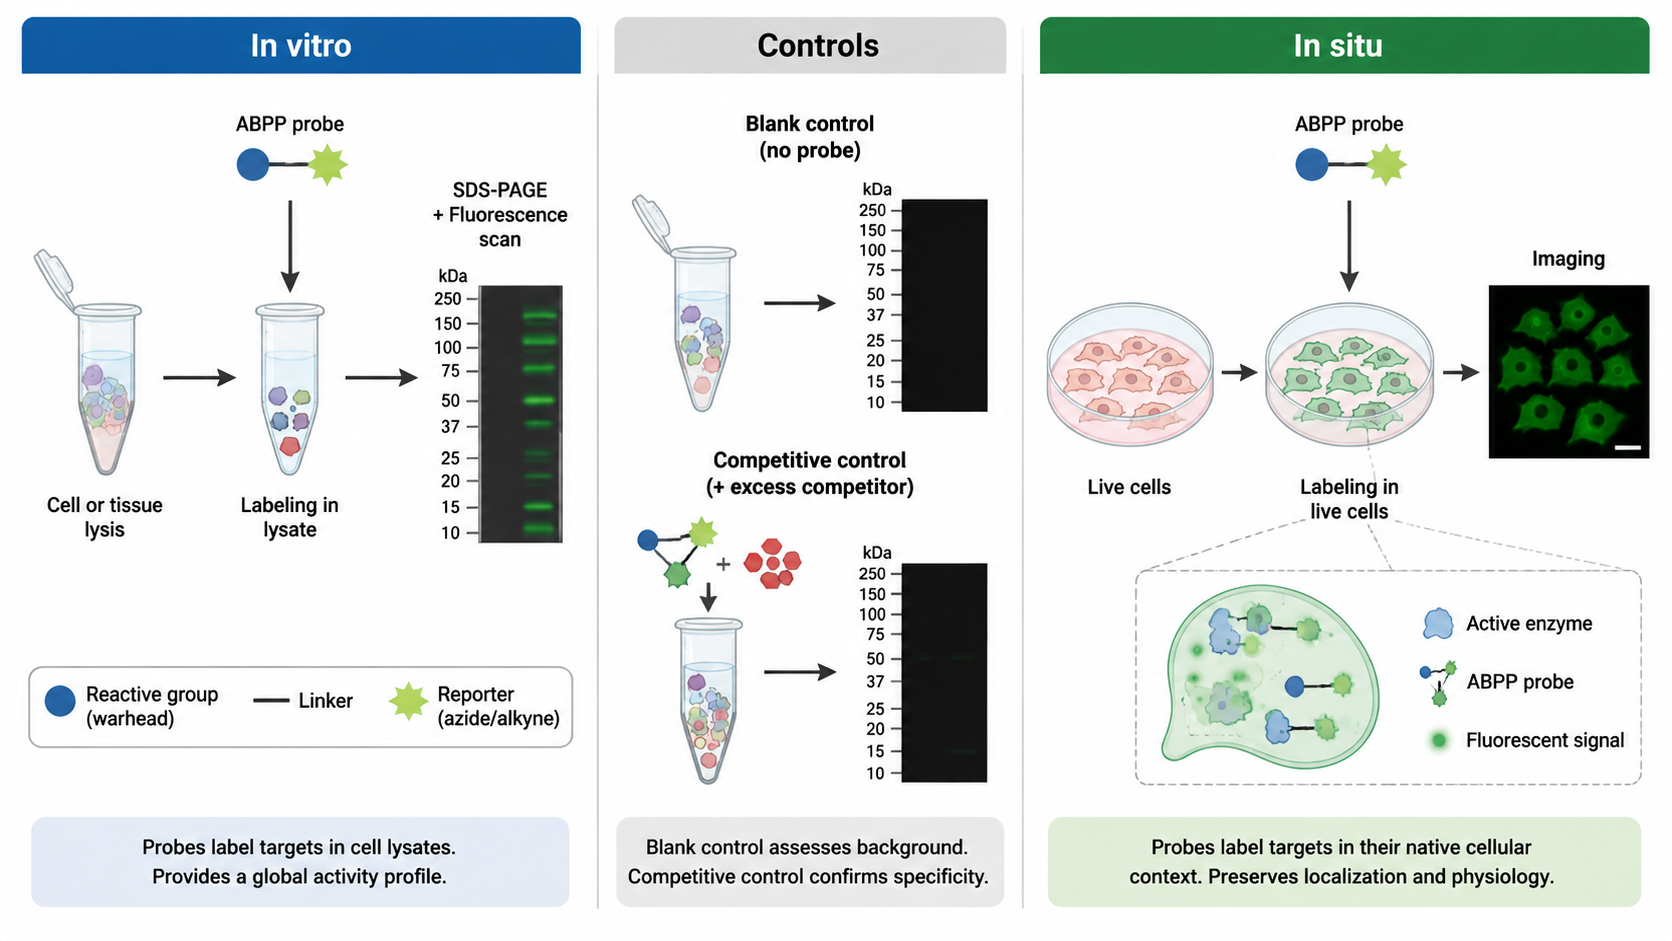
Step 3: Probe Labeling Modes
1. In Vitro Lysate Labeling
Extract protein while preserving activity, incubate with probe for roughly 30–60 minutes, quench the reaction, then move to enrichment. Lysate labeling suits enzyme screening and many drug-mechanism studies because conditions are easier to control.
2. In Situ or Live-Cell Labeling
Add probe to intact cells or tissues, then lyse quickly after labeling to capture near-physiological activity. This mode better reflects cellular context but requires attention to probe uptake, toxicity, and timing.
Include blank and competitive controls in both modes. Competitive inhibition with excess active-site ligand helps separate specific probe engagement from background labeling.
Step 4: Enrichment and Proteolytic Digestion
After labeling, enrich probe-tagged proteins away from the bulk proteome. Biotin-tagged probes often use streptavidin beads; click-enabled probes use azide–alkyne conjugation to an enrichment handle before pull-down.
Digest enriched material with trypsin or an appropriate protease to generate peptides for LC-MS/MS. Enrichment efficiency and digestion consistency are common bottlenecks. Weak enrichment appears as noise in the activity profile rather than as low expression.
Step 5: LC-MS/MS Acquisition
Typical setups combine nanoflow reversed-phase LC with high-resolution MS. Data-dependent acquisition (DDA) and data-independent acquisition (DIA) both work when the study design matches library depth and quantification needs.
Quantification can be label-free for flexible pilot studies, or multiplexed with TMT or iTRAQ when batch comparison across many conditions is the priority. Decide acquisition and quantification before running samples so replicate structure and instrument time stay aligned.
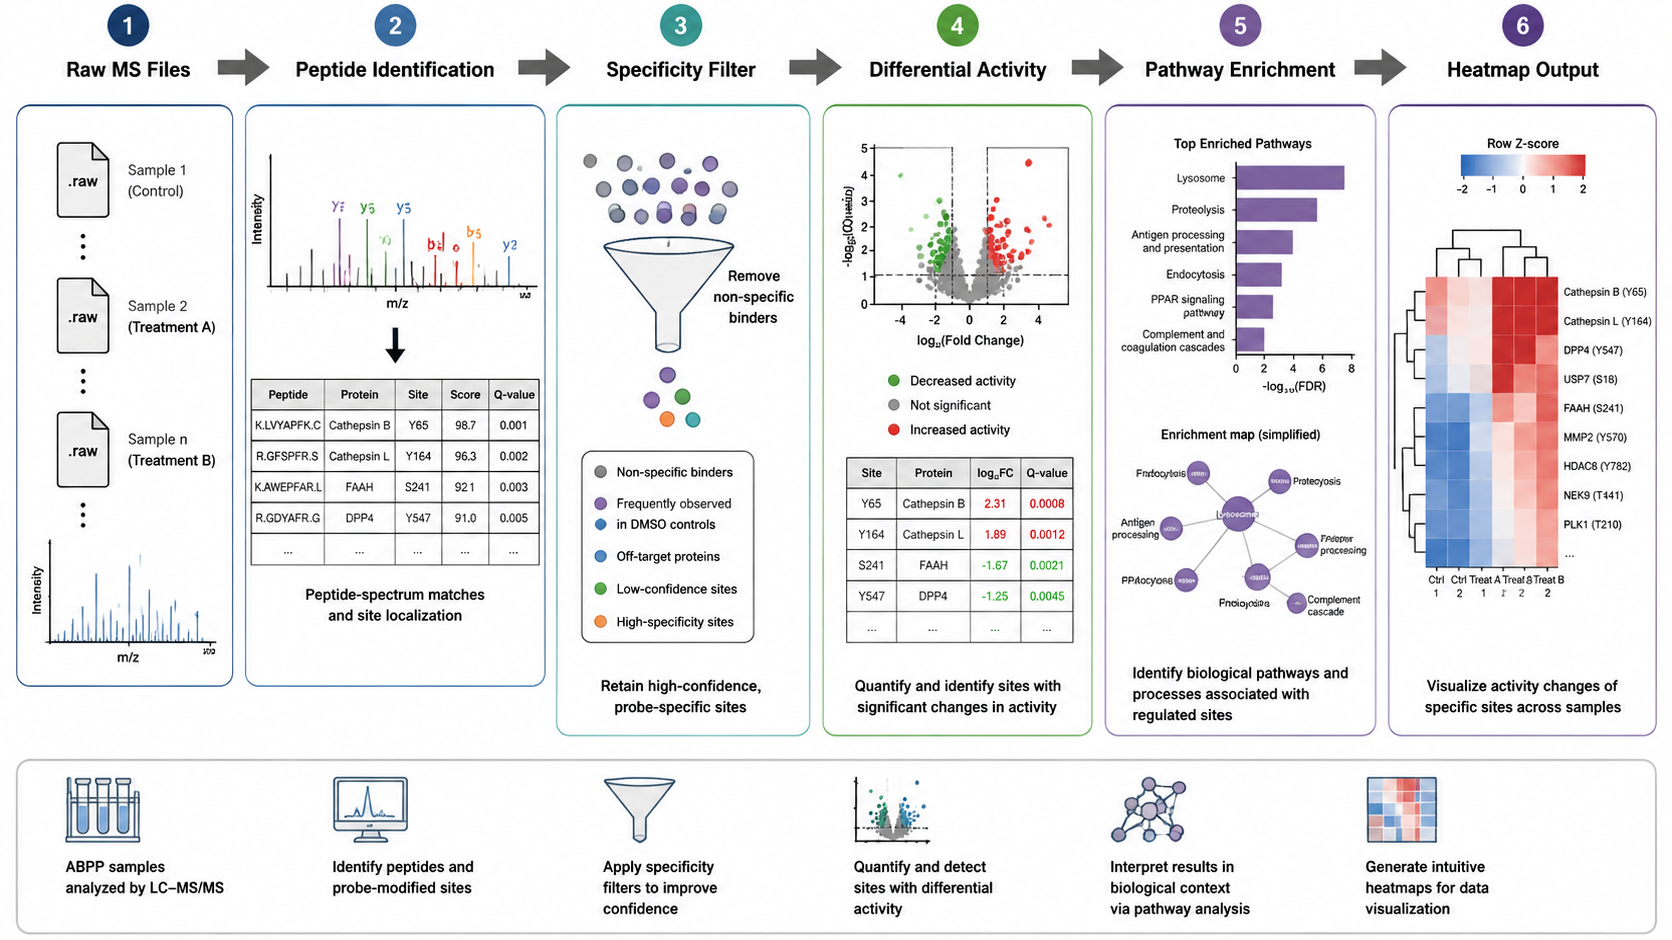
Step 6: Data Analysis and Activity Profiling
| Analysis stage | Main Goal | Practical Output |
|---|---|---|
| Peptide identification | Map spectra to proteins | Protein–peptide evidence tables |
| Specificity filtering | Keep probe-dependent signals | Curated labeled enzyme set |
| Differential activity | Compare treatments | Log2 fold change with FDR control |
| Functional annotation | Explain biology | GO, KEGG, or Reactome enrichment |
| Visualization | Communicate results | Heatmaps, networks, pathway plots |
Use established search engines such as MaxQuant or Proteome Discoverer, then filter for probe-dependent labeling. Compare treatment versus control with log2 fold change and false discovery rate thresholds suited to the experiment size.
Strengths, Limitations, and Method Fit
ABPP excels when catalytic state matters more than abundance alone. Limitations include probe class coverage, cell permeability for in situ work, and dependence on enrichment quality. ABPP complements expression proteomics and competitive assays but does not replace every biochemical readout.
FAQ
1. What proteins are suitable for ABPP?
ABPP targets enzymes with reactive active sites that accept covalent probes, including many proteases, phosphatases, and related hydrolases.
2. How do you reduce probe non-specificity?
Use blank and competitive controls, optimize probe concentration and reaction time, and require probe-dependent enrichment before calling differential activity.
3. How many replicates does ABPP need?
Plan at least three biological replicates. Multiplexed quantification (for example TMT) can reduce batch effects when many conditions are compared.
4. Can ABPP use DDA or DIA?
Yes. Choose DDA when deep ID-focused libraries are already available; choose DIA when consistent quantification across many runs is the priority.
Conclusion
A successful ABPP experiment is a chain of aligned decisions: the right enzyme question, matched probes, controlled labeling, clean enrichment, thoughtful LC-MS/MS acquisition, and analysis that treats activity as the primary variable. Teams that document each step and control specificity early move faster from raw spectra to mechanistic insight than groups that treat ABPP as a standard expression proteomics run with a different probe.
How to order?